Results

The Dragonfly Page

I did it. I completed the long delayed ‘personal’ project I was working on. As I said, its a personal project and has nothing to do with my work. Its something I started around 6-8years back. I spend so much time over it that I thought I was never going to finish it, ever. I had refined and redesigned it more than 10-20 times, and explored new technologies each time I restarted it. But this time it was different, I promised myself that I am going to finish it before the end of 2010. And I did it. You can check it out here – The Dragonfly Page. (Access the site at http://www.thedragonflypage.com)

I think you got what I am talking about, its my personal website. The first time I built a site for myself was back in 2000. Internet was more like Disneyland to me, it amazed me and I wanted to be a part of it. HTML was way too simple back then. Just some tags, some images and some captions and I had my site. I hosted it in yahoo geocities. But geocities used to put a big banner (ad) on top of the site and all formatting I worked on for hours, simply went haywire.

Later when I was doing my undergrad, I started rebuilding it from scratch. I moved my domain to tripod.com which was referred to me by my friend Jayanth. In tripod, there used to be an option of choosing the ads to be displayed in popup windows, so that the page formatting remains intact. But I never got to finish the site due to various other reasons. I think the “site under construction” page is still there.

Even though I continued experimenting with various site designs and stuff during the years that followed, the next real effort was around 2006-2007 time period. I wanted to buy myself a domain and build a better site equipped with technologies like flash, java script etc. I completed almost all the graphics and page designs. Again, due to various reasons – laziness being the prime reason - I never got to publish it. But I kept all those graphics and most of the designs which I am using currently.

The logo I designed last time

This time it was different, I had access to many resources like a server to host the pages, all the tools to build a site etc and I didn’t want to waste them. But the main motivation came when I browsed through some of the recently updated sites of my colleagues and friends.

This time, I wanted to start and finish the work in one go. I didn’t explore any new technologies and I used my previous design as a starting point, used almost all the previous graphics and reduced the number of pages planned for the site. There are still a couple of more ideas I want to integrate to thedragonflypage. They will be incorporated when I roll out version 2.0, which I hope will be in the near future.
Hope you like the site and if you do, please leave your comments/suggestion here or through the feedback form.

Special thanks to THESITEWIZARD.COM from where I got the tutorials required for building my site.

My new blog - The Dragonfly's Wall

There was a time when I used to browse hours and hours for high definition wallpapers to decorate my desktop. I found it very frustrating sometimes to find good wallpapers that matches my style. But after I started photography as a serious hobby, I combined it with my photoshop skills to create wallpapers for my desktop. Recently I began thinking why couldn't I make them available to all those who are in search for better wallpapers. That thought resulted in my new blog - The Dragonfly's Wall.


 I hope you will like the wallpapers posted in my blog.

Archery – The art of perfection

One day, Guru (teacher) Dronacharya decided to test his students in their skill of archery. He hung a wooden bird from the branch of a tree and then summoned his students. He asked the first one to aim for the bird's eye, but not shoot just yet. He then asked the student what the student could see. The student replied that he could see the garden, the tree, flowers, etc. Drona asked him to step aside and not shoot. He repeated the same process with a few other students. When it was Arjuna's turn, Arjuna told his Guru that the only thing he could see was the bird's eye. This satisfied the Guru and he allowed Arjuna to shoot the bird and his shot pierced the bird's eye.” – Excerpt from epic Mahabharata about the great warrior Arjuna which shows the power of focus and concentration.

I started archery just out of curiosity, but found myself attracted to it quite fast. One reason is the amount of focus required from the moment you take your bow till you release your arrow. Your mind needs to be calm and all you need to see is the golden circle at the centre of the target. Once you release your arrow, you know whether your form was good and you'll score an 'X' or whether you are going to score a 'M'.

Archery is the art of perfection. If the archer has got a perfect form and if the equipments are in the perfect condition, his shots will always hit the gold.


10 things I would like to see in Gingerbread (next Version of Android)

No, I haven’t stopped blogging and I don’t plan to close my blog.
Yes, I will try to blog regularly, but may be less frequently.
No, I didn’t blog for sometime ‘cos I was lazy or ‘cos of lack of subjects.
Yes, I couldn’t blog for long ‘cos of my hectic schedule (not work overload) even when there are lots of things in pipeline, I wanted to write about.
With that said, here is my next blog...

10 things I would like to see in Gingerbread

Since the iPhone 4 buzz is slowly settling down, I see a lot of talk about the next version of Android, code named Gingerbread in tech circles. After reading most of the articles and the rumors, the only thing I am sure about the next release of Android OS is that its code name is Gingerbread. You heard it right, that’s about it and everything else is just speculations and rumors. Out of these, the most prominent speculations are,
1. Minimum hardware requirements of the Gingerbread are a 1 GHz CPU & 512 MB of RAM. (2GHz is more like a rumored rumor, if you know what I mean)
2. A completely revamped mind blowing GUI.
3. Support for bigger displays with higher resolutions around 1280 x 760.
4. Release date is mid of Q4 2010, mostly Oct 15th or 16th.

And some of the “really-not-sure” rumors are,
1. Gingerbread is targeted for high end hardware and therefore the devices might be costly.
2. GUI will be similar to current Gallery App.

I couldn’t find any rumors about any OS level changes or support for any new hardware. You might have noticed that I haven’t specified a version number. Some argue that Gingerbread will be 3.0. Some others say its going to be 2.3 since it’ll be a continuation of Froyo (Android 2.2).

What I want to see in Gingerbread is listed below (both new and fixes to current features)
(Note: This is also a “review after 3 months' use of Google Nexus One” too)
1. A revamped Gallery App or at least a faster, smother, bug fixed version. Yeah, you haven’t read wrong. I know the current galley app is one of the best & most hyped (in terms of look & feel) in Android, but it has lots of problems namely,
  • It simply won’t show images downloaded through some third party apps.
  • Sluggish at times, especially when deleting images. It takes some time for the next image to load and when I navigate to next one, it get stuck in between.
  • When selecting and deleting multiple images, it behaves strangely - it shows random images and has to be closed and reopened.
  • Sometimes, it just won’t show any images and simply displays the message “Loading new albums”
2. A new UI as given in the speculations sections. A mobile device is mostly about its look and feel and a new UI will be a great boost to Android. I would like to see more glossy icons with lots of reflections without affecting its speed. But if they want to make it like gallery with all the above stated problems, I say no to that.
3. Wireless syncing and ability to join adhoc Wi-Fi networks. It would be nice if a PC can recognize the phone when its near and if we can use an explorer/browser to sync/transfer files.
4. A better Wi-Fi stack – the current stack is not perfect.
  • Occasionally it won’t connect automatically to pre-configured hot spots, saying its disabled.
  • Sometimes, it won’t scan even if the user issues an explicit scan command.
  • Now my work around to the above problems is to turn off & on the Wi-Fi, but I want this issue to be fixed.
  • More configurations can be exposed to user.
5. A new music player. Its not that the current one doesn’t serve its purpose, but there is a lot of space for improvement, like a good equalizer or wireless syncing option etc.
6. Support for more video formats and resolutions.
7. All Google Apps directly from Google and not from third parties. E.g. GTasks, Google Docs etc
8. Ability for more ‘screens/desktops’. Now Android supports a total of 5 screens. It would be nice if it gives the option to configure the number of screens.
9. Offline Google maps. I don’t want the whole Google maps stored locally in my phone. But an offline mode will be great which can buffer recently navigated areas.
10. And finally, a phone application/software straight from Google - like iTunes, may be a browser based one, which can do the following things,
  • Browse the android phone & SD card
  • Convert videos to any android phone specific formats
  • Wireless syncing for music, videos, files etc
I came up with this list after being the owner of Google Nexus One for around 3months. Hope to see these features and a lot more in Gingerbread.

Tilt-Shift Effect a.k.a. Miniature Faking Effect

I always loved miniature models of cities or objects, both in real world as well as in a computer. The process of making them is an art of perfection, like the effort one has to put in to grow a bonsai tree.
I was really amazed to see this picture while I was browsing through flickr pages. I was thinking, “This guy must have put in a lot of effort to make this model” when I saw the footnotes. It said “post processed the tilt shift effect in photoshop” which meant, I can create this effect using photoshop. I didn’t believe it at first. But, after around 5-10 minutes of Google-ing and around 20 minutes of photoshop-ing, I had my first tilt-shift image ready. I used a random snap at first but later tried it on a real photo. Here is a small tutorial on how to do it in photoshop. You can find many tutorials in net and the main steps are same. I have added some tips from my personal experience.
According to Wikipedia, “Miniature faking is a process in which a photograph of a life-size location or object is made to look like a photograph of a miniature scale model. Blurring parts of the photo simulates the shallow depth of field normally encountered in close-up photography, making the scene seem much smaller than it actually is; the blurring can be done either optically when the photograph is taken, or by digital post-processing. Many faked-miniature photographs are taken from a high angle to simulate the effect of looking down on a miniature.”

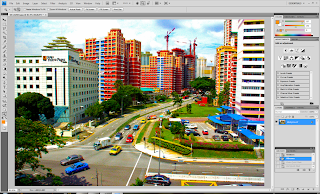
1. Initial photo. I had to go up to the 6th floor to get enough elevation required for this effect. This is the main requirement for tilt-shift effect. If the photo is taken from a sufficiently high altitude, it’ll give the impression of looking down at the model.

2. After pre-processing. I did some pre-processing to make the image look a bit artificial. The properties I manipulated are Levels, Exposure, Variations, Shadows/Highlights and more importantly Vibrance/Saturation.

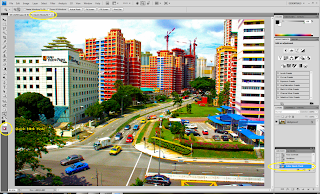
3. Enter ‘Quick Mask’ mode either by pressing the quick mask button (highlighted in the image) or by using the shortcut ‘Q’

4. Select the ‘Gradient Tool’ and then select the ‘Reflected Gradient’ as shown.

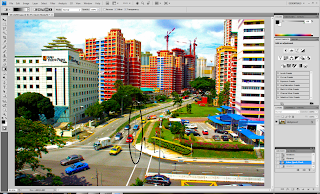
5. Decide which part to highlight in the image. Then click & drag a straight line (press down the ‘shift’ key) from that point to top or bottom.

6. When click is released, the area will be selected in a gradient red color.

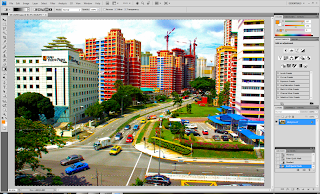
7. Exit ‘Quick Mask’ mode by pressing the quick mask button (or ‘Q’). This will give you a ‘marching ants’ selection in the image. We are going to blur the selected area to simulate shallow depth of field.

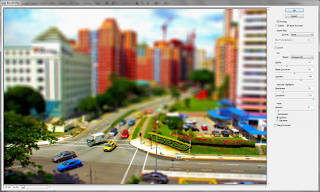
8. From the ‘Filter’ tab (as shown), select ‘lens blur’.

9. Now this is where you can get creative. The values I have used for this tutorial are shown here. You can try playing around with the values for different results. But, I’ve got to warn you, it might take some time (depending on your graphics card) for the preview to load, especially if its a big image.

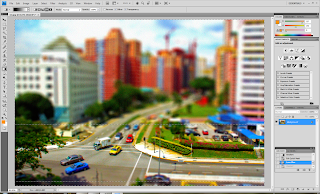
10. When you are satisfied with the image in preview, press ok to exit. Deselect the selected parts using ‘Ctrl+D’ and you are done.

11. The finished ‘tilt-shift’ed image.

Result of experiment no. 1

Result of experiment no.2

These are just the main steps in creating the effect, but there is more to it and I am still learning. The image saturation and the shadows/highlights play an important role in making the image look like a miniature model. But the most important factor in my opinion is the contents of the image. If its a picture of nature, it might not look as ‘perfect’ a miniature model as compared to an image with lots of objects or people. See the difference for yourselves in the photos below.

California National Park: A lovely snap taken by a friend of mine. More of his photos here.

After applying tilt-shift effect

A random snap downloaded from internet as I couldn’t find any of my photos with lots of people in it.

After applying tilt-shift effect
More links
1. Tilt-Shift Photography Photoshop Tutorial
2. Tilt-shift photography – Wikipedia
3. Flickr Group: Tilt-shift Miniature Fakes

Travel Guide: Pulau Rawa

Its been only around a week since I am back from Rawa Islands and already I am missing that place. It really is a paradise - see it for yourself from the snap below.

This is the perfect place if you are looking to take a break from a hectic schedule or if you are longing for a weekend getaway from the city. You wake up looking at the beach and the clear blue water, with the mild wind blowing at your face. Eating, drinking, and playing at the beach are all I did the whole time I was there, as I was looking for a very relaxed, ‘be-as-lazy-as-you-want’ kind of a break and I am not out of that mode yet.
When I was planning this trip, I had to do a bit of ‘asking-around’ as this is not a destination to which you can find a lot of travel agent tour packages. A couple of my friends and colleagues also asked me about the trip after they saw the photos. So this time I am attempting to write a ‘travel guide’ to Rawa. (Note: All the prices quoted are at the time of my travel and may vary with time)

Pulau Rawa
Pulau Rawa is a coral island off the east coast of Johor, Malaysia, 16 km by boat (30 minutes approx) from Mersing town (Wikipedia). The beach is made of pure white soft sand and the water is clear blue in color. You wouldn’t want to get out of the water, any time.

Accommodation
There are two resorts in the island, Rawa Safaris and Alang’s Rawa. Both the resorts offer tour packages, but I didn’t go for them as I like to decide on my own. Also I wanted to try the restaurants at both resorts.
At Alang’s Rawa (where I stayed) - previously known as club Rawa - the most sought out chalets are the two facing the beach (shown in the snap) and you might want to book these at least one month in advance if its peak time (April - September). The room charges are RM220 per day (twin sharing). More details can be found in their site.

Food
The main reason I didn’t go for a package is ‘cos I wanted to try the restaurant in the other resort. After having my first meal at Alang’s Rawa, I knew I would be having all my meals here only. The food was so tasty that I wished I had a bigger tummy. At Saturday nights, they provide an excellent barbeque dinner. Average meal cost is around RM35 (BBQ cost is RM60).

Drinks
Bottled water is costly in the island and its better to stock up at Mersing. The well water is salty. But they provide beverages (cocktails, liquors, beers) and juices at a very reasonable cost. Since its a party atmosphere at the bar at nights, there is a possibility that the beer get over on weekends and you may have to wait for the supply boat to get it from Mersing.

Activities
Even though its an ideal place to be lazy, there are some activities you can try there. The obvious ones are snorkeling, island hopping etc. Rawa Safaris resort rents Kayaks at RM35 per hours and you can go around the island, if the sea is calm. If you have an Advanced (or better) diving certification, you can rent the diving equipments from the Rawa Safaris for RM95 and venture in to the corals near the beach on your own. If you want the tank only, the cost is RM20. The max depth is around 9m. A couple of staff I talked to, told me about the existence of baby sharks around the island. But I was not lucky enough to find one. They also told me about a small jungle path behind the resort which can make a small trek.

Getting there (from Singapore)
If you are a very lazy person, you can straight away book a bus to Mersing from Singapore (Five Star, Transnasional etc) and the cost is around S$30 per head, one way. But I prefer the ‘do-it-yourself’ way. I booked the bus to Mersing from Johor – S&S International (One way cost - RM10). Travelling time is around 2hrs. Another option is to book Causeway Link Express. The timings are displayed at the ticket counter. For both, one has to personally visit the Larkin bus terminal in Johor. From Singapore, you can take the MRT to Woodlands MRT station, get the SMRT bus no. 950 to Woodlands checkpoint. From there, take SBS 170 to Larkin terminal. From Woodlands checkpoint, it will take around 20 minutes to 40 minutes to reach Larkin depending on the queue at the checkpoint and the traffic. Even though I booked the 8:30 am trip, the bus started at 9:30 am only due to some repairs.

Back to Singapore
For travelling from Mersing to Johor (on Sunday), I booked the ticket at Mersing Bus terminal on my way to Rawa on Friday. The bus timings chart is given below. The 8:30pm bus I booked came at 10pm only. Always expect some delays if you are thinking of a bus journey and plan accordingly.
Another option is to take a taxi from Johor to Mersing and back. I did it during my last trip to Pulau Tioman. The taxi cost from Johor to Mersing (Friday morning) was RM150 and from Mersing to Johor (Sunday evening) was RM200. You need to bargain for the lowest fare.
I guess that’s all what you need to know for a trip to Rawa. Visit the resort’s website and shoot a mail asking for a reservation. Book the bus, pack your bags and simply go and have the time of your life in Rawa. For any missing details, just drop me a comment.

Some Snaps

Larkin Terminal, Johor with S&S bus

During the 10 minute walk from Mersing bus terminal to ferry

Ferry timings – I hear that if there are around 5-7 people and pay around RM50, they will drop you at RAWA on their way to Tioman.

Rawa Safaris Office at Mersing

Private Jetty from where we board the speed boat

Rawa Island

The main dock at Rawa. However the speed boat directly drops you at the beach.


Alang’g Rawa – The big hut is the bar and restaurant and the other A-frames are the chalets.

The speed boat ride

Where I stayed – The hut in the left

Twin sharing room

Get tanned – All the facilities are free here. You don’t have to rent any life jacket or snorkeling equipments. But I have to warn you about one thing, its been used by many people and the equipments may not be in an excellent condition.

Dreamy Rawa

The beach from the restaurant. You will never get bored sitting here, sipping a cocktail and watching the ocean.

A romantic remote part of the beach. You can literally call this a private beach, just for you.

Bus timings back to Johor from Mersing.
More snaps here

GUNDAM Modelling - My new obsession!

Well, I cannot exactly say it’s a completely new obsession. It dates back to 2007 when one of my friends bought me a RX-78-2 Gundam (1/100 scale, if I remember correctly) model from Japan. He knew that I am interested in Lego and ‘Bionicle’ kinds of stuff. He wanted to give me something more and challenging and bought me my first Gundam. I opened the package and was really amazed to see all small parts. It took us around one day to completely assemble the RX-78.
That was the start. After that, I started reading about Gundams. I told my friends in Japan to get me the anime series. I choose Gundam Seed Destiny, the latest one at that time, to start with. I loved the anime and wanted a Justice Gundam, but settled for a Freedom (1/144). I couldn’t pursue this hobby further as there are not many options available in India.
By the end of my last semester, I started thinking about Gundam again. This time I started with Wing Series as I loved the Wing Zero Custom, a lot. Of course, I watched the Unicorn OVA too. This time I had all the options available to me and the day my exams were over, I picked up a Unicorn (HG) from Toys ‘R Us and started working on it. This time, I didn’t feel very good after completing the unicorn - it looked like a plastic toy. I wanted to do more and that’s when I started searching for Gundam modeling, stores etc and stumbled to this blog. I visited Hobby Art Gallery the same day and was amazed to see the models displayed there. At first, I thought they are costly kits with perfect ‘out-of-the-box’ looks. After a couple of visits to other modeling shops and more browsing, I figured out there is much more to model building.
Equipped with all these information, I collected some modeling tools, paints and stuff and started redoing my unicorn. I was afraid to use Gundam markers at first as I didn't want to spoil the model. But I had to start somewhere and one day I did it. The end result was not very good, but much better than out-of-the-box stock plastic look. I wanted the gloss look and used a gloss topcoat. That did not give the looks I wanted (I suspect the white color body) and so I did a flat coat over it. Here are some photos.

My Unicorn dismantled & ready for painting

“Warzone” - after painting. I used Tamiya colors.

After assembly and ready for top coat

After top coat – It’s not much of a difference. Also you can see my Gundam marker missed some grooves and made a mess.

My first completed model.

With cover

My Next project - A Wing Zero custom MG, I picked up from HAG.

After seeing the models displayed at HAG, I know I am no way near where I want to be. I am lucky that HAG is offering modeling courses and I will be starting one soon. The two blogs which helped me a lot in my endeavor are http://www.dannychoo.com/ and http://toymakerinc.blogspot.com/.

Reflections

One and a half year! It’s been around one year and 6 months since I reached Singapore. It has been a period filled with twists and turns – all of them, amazing. Now when I look back, I am proud to say that it has been one of the most rewarding periods in my life. Most importantly, the reason for what I came here for, I have completed with a (self) rating of exceeding expectations – Yeah! I graduated, with flying colors.
I came to Singapore for doing my masters. I was a bit afraid and didn’t have any idea about what to expect. My friends had warned that life will be very difficult without a job and friends. I truly hoped that I am prepared to start out from scratch, to get out from the comfort zone I was in, 1.5 years back. I vividly remember sitting at the stairs of my apartment (22nd floor) the night I reached here, alone, sipping a beer and thinking how I would feel or where I would be, two years down the line. And now, here I am, 1.5 years down the line, finishing my masters, with a group of amazing friends - just the way I always hoped for, with a job I always dreamed for and looking forward an exciting future.
When I made the choice to come here and purse higher studies, I could only hope that it would be a good decision. But now I can ‘state’ that it turned out to be one of the best decisions I have ever made. During the last 1.5 years, I have met some of my best friends ever, who are part of my life more than even I am part of my life, learned a whole lot of things (of course that was the main goal), more than that, the course sparked my interest in many fields I never thought I would find interesting (e.g. probability theory), found a job which is extremely satisfying, which allows me to do the things I love to do, met lots of people who opened up the whole new door of exciting opportunities that I can pursue. I learned to adapt to different environments, managed to balance work, study and personal life, learned to work under a hectic schedule, more than that, I learned how to keep my spirits up even when I had to work 24/7. I traveled a lot, experienced different things, met different people and discovered the world under the water & over the mountains and many others. The tenure at NUS exposed me to the amazing possibilities the world has to offer, or more accurately, the power of knowledge.

I can say from my heart that I have thoroughly enjoyed my learning experience in NUS, and I truly wanted to gain knowledge which is very different from my school days when I studied to somehow push through the exams. I know I have only managed to get a glimpse of the amount of knowledge out there, and that excites me. When I completed my undergraduate studies, I didn’t have a very good idea as on what is it that I want and I moved along the crowd. Now I know what is it that I want, or more like, what is it that gives me the feeling of “Wow! This is awesome; I want to do more of this”.
Above all, I would like to thank NUS and each & everyone who were (and still are) part of my journey - my parents, my sister & brother-in-law (who gave me the inspiration at times when I was down), my friends, my teachers, my colleagues, and to that occasional ‘stranger’ who gave me hope when I didn’t know what’s next, whom some people call, God.

Tribute to a friend who fought and died!

He was born somewhere in Japan. I heard about him around four years back. He was stylish and the best in what he did at that time with some unique features no one else could match. After some self-debate, I decided to invite him to my life, as a friend who stays by my side no matter where I go or what I do. And he came. He did come with me no matter where I went or what I did, literally. We climbed mountains, did scuba diving, enjoyed the beauty of nature and did a lot more, together. He opened a whole new world of opportunities before me which I never knew existed. He inspired me and helped me inspire others. And he died, last month. It might be better to say I killed him, unknowingly. He didn’t give up till the last moment, he fought and died.
I am talking about nothing but my beloved camera, Canon IXY 800IS (a.k.a IXUS 800IS or SD 700IS).

Just after I bought it

Released in 2006 February, IXUS 800IS was the first point and shoot camera with the Image Stabilization (IS) feature. It was when I was looking for a new camera that I heard about the IXUS 800IS. I didn’t have to do a lot of research as I always wanted to get a Canon IXUS and also since all the reviews said IXUS 800IS was an excellent choice. And from my experience I’ve got to say, it was an excellent choice I made.
I still remember the day when I got it. It was during 2006 Onam celebrations. It has been almost 4 years and I have taken around 30,000 photos with it. Yeah, that’s a lot of photos and the CCD was showing signs of aging recently. Still, the photos I took with it are amazing. I bought the waterproof cover shortly after I bought the camera and I have taken my IXUS literally everywhere I have gone. I have photos from each and every month since I bought this it.
Last month, I and my friends went to a water theme park and that’s when it happened. As usual, I cleaned the cover and the O-ring, put silicon grease and fastened the camera inside the cover. We took some photos in water and after sometime I noticed the camera restarting periodically. Immediately I went back to the dry area and opened the cover to see it was half filled with water. I might not have closed the cover properly. I tried my best to save it, but I guess it was not my day. Even when it was half filled with water, the picture we took were of the same quality as before and I could retrieve them from the SD card later.
During the 4 years I had the camera, many things happened in my life and I have snaps of most of the memorable moments. Even after I bought my DSLR, I used IXUS just as before. Both served very different purposes for me. It really showed me what photography is about and I doubt there are any settings in the camera which I have not experimented with. I guess the time has come for me to move on. There may be a lot of high end cameras out there with awesome specs, but I really doubt whether I could find one which could truly match my beloved Canon IXY 800IS.
Here are some of the best shots (unedited) and memorable moments which originated from my IXY’s CCD,

One of the very first photos which showed me IXUS’s potential

One of my most viewed photos in flickr

A beautiful moment from my life back in 2006 - taken during our trip to Kalakayam, Trivandrum

X’mas celebrations at my old office

Underwater Self-Portrait - One of my first experiments with the underwater photography

Water-vision – This is how you will see sky if you look up under water

Fireworks – I never got enough of ‘firework’ photography

A nostalgic moment

Time standing still – Saying goodbye to one of my best friends, ever.

Family Reunion – My grandmother’s 80th birthday celebrations at my home

Vishu – A local festival

I always loved colors...

Panoramic View – I was breathless when I first saw what this camera was capable of

Another X’mas at home

Water - when time stands still

After a rainy morning

Playing hide ‘n seek

Singapore!

Making new friends – During our trip from NUS to Melaka, Malaysia

Friends forever – Kuala Lumpur, Malaysia

Nemo and his father – it’s a totally different world down there

Me, after my first set of dives

One hell of a start – New year celebrations at Phuket, Thailand

Final moments – I think that’s when water started getting in the cover

Last shot – The last shot which my IXY 800IS took

More photos in flickr